Grades are up and for all intentions and purposes this class is over and this blog is dead. If you are upset with the grade you received for this class or studio I would like to direct you to this post by Rex.
I appreciate all of your hard work this semester and I think we were very successful in standing out in both the quality and quantity of our work compared to that of other studios at this class level. I hope all of you go on to kick ass and take names, hopefully we have armed you with the skills necessary for this endeavor.
Intangible J, signing off.
Monday, December 15, 2008
Arne Quinze and Implementation

I have been following the work of Arne Quinze for some time now. His work may be controversial due to the environment that he sets them up in, but I think that the juxtaposition between his pieces and the surroundings lends a very interesting feel to his art. It is easy to see the architectural tendency of his art, which opens up a new discussion:

We are all familiar with the work of leading deconstructionist architects such as Libeskind, Hadid and the infamous Gehry, but the debate has continued over the relevancy of their built work. If the building does not function as a building, then is it architecture?

Maybe as architects we should embrace new concepts, theories and most importantly; technology. But instead of harnessing these elements into forms of the past, we should look to forms of the future, or better yet, new mediums to publish designs. The best part of Hadid's work are the paintings she creates to argue her design. I do not think these buildings should ever jump from the canvas, their potency is evident enough.

I call for all of us as young designers, artists and architects to challenge the conventional mediums of publication and seek new methods to push the boundaries of what is architectural design. Maybe the point of this class was not to use the computer to manufacture standard practices, but to understand the computer as a tool to further expand our design vocabulary.
Tuesday, December 2, 2008

Sunday, November 23, 2008
Muzak
www.dropboks.com
login: avd@dodgit.com
pass: 123456
We will keep updating this location with more music, I would highly recommend you download all that is available.
login: avd@dodgit.com
pass: 123456
We will keep updating this location with more music, I would highly recommend you download all that is available.
Final Submission
pdf link
You will gather together all the required items detailed on the link and follow the strict guidelines for submission. Discs that do not include the required folder hierarchy or file name nomenclature will be dismissed as incomplete work. Remember that the files you include will stand for the work you have completed in this class for the semester. This allows for you to touch up these assignments, or complete them.
DUE on SATURDAY, DEC. 6th by 4:30pm
a labeled CD/DVD of your work
on my desk in room 402
You will gather together all the required items detailed on the link and follow the strict guidelines for submission. Discs that do not include the required folder hierarchy or file name nomenclature will be dismissed as incomplete work. Remember that the files you include will stand for the work you have completed in this class for the semester. This allows for you to touch up these assignments, or complete them.
DUE on SATURDAY, DEC. 6th by 4:30pm
a labeled CD/DVD of your work
on my desk in room 402
Wednesday, November 19, 2008
Part 4
The last leg of this assignment will focus on presentation and display graphics. I mentioned many times on tuesday about thinking of your renders and how they would relate to different forms of information on the printed sheet. I encourage you to look at the renders as ways to pull drawings and diagrams together, not cloister them apart. On thursday I want to have a discussion as a class on all the issues dealing with graphics. Therefeore each of you will post on their blog an example of your presentation boards. You are required to post a minimum of one image at 1500 pixels wide, 72 dpi. This example should be polished and completed. All line drawings should be taken into Illustrator and cleaned up. All renders should be complete with post-process techniques. There will be no placer boxes, where information will go. Remember that we will be discussing all issues of your board, the indvidual pieces of the layout, and the layout as a whole.
You will do the same for your portfolio. Submit 3-4 sample pages at 1000 pixels each, 72 dpi. These should also be finished, not working pages. This is your last chance to discuss with me in a classroom setting your graphic designs, so show me your best work so that we may learn as a class.
DUE on THURSDAY, NOV. 20th
on your blog MIN. 1 PRESENTATION BOARD
on your blog MIN. 3 PAGES FROM PORTFOLIO
all work will be complete, no placeholders!
You will do the same for your portfolio. Submit 3-4 sample pages at 1000 pixels each, 72 dpi. These should also be finished, not working pages. This is your last chance to discuss with me in a classroom setting your graphic designs, so show me your best work so that we may learn as a class.
DUE on THURSDAY, NOV. 20th
on your blog MIN. 1 PRESENTATION BOARD
on your blog MIN. 3 PAGES FROM PORTFOLIO
all work will be complete, no placeholders!
Monday, November 17, 2008


Part 3
Many of you have failed to submit your work for Part 2. Before you submit Part 3 for tuesday, I suggest you post Part 2 on your blog.
By tuesday you should have 2-3 views that our almost done. Now is the time to begin adding on levels of information to your renders. Evaluate the work you have so far and question what could be added to explain your design ideas even further. Levels include
Use your own discretion to make these renders as beneficial as possible. Remember at all times that the purpose of these renders is not only to give the reader a sense of your space, but also to communicate your design and your concept. Focus your renders on your structure, your spectacle, and any of the really interesting elements that sell your building.
DUE on TUESDAY, NOV. 18th
on your blog 3-4 RENDERED VIEWS
that make use of post-process techniques
By tuesday you should have 2-3 views that our almost done. Now is the time to begin adding on levels of information to your renders. Evaluate the work you have so far and question what could be added to explain your design ideas even further. Levels include
- wire frame underlay to show details of construction
- color overlays to highlight parts of your building
- subtracting parts of your render to bring other parts forward
- heavy outlines
- scale figures to show function and potential use
- written descriptions to call out details of your design
- photoshop texture overlays
Use your own discretion to make these renders as beneficial as possible. Remember at all times that the purpose of these renders is not only to give the reader a sense of your space, but also to communicate your design and your concept. Focus your renders on your structure, your spectacle, and any of the really interesting elements that sell your building.
DUE on TUESDAY, NOV. 18th
on your blog 3-4 RENDERED VIEWS
that make use of post-process techniques
Wednesday, November 12, 2008
Part 2
For thursday I need to see progression in digital modeling. I want each of you to take a stab at a style from a precedent. This means looking at a render and deducing out how they accomplished this look. We will have individual crits to discuss process and techniques so have something to discuss. You must decide quick on which views you choose to use and how you want to make these views sing. We looked at many different examples on tuesday and below is the source found by Strickland. I highly encourage any civic minded students to share any spectacular links that may be helpful to the class as a whole. Remember, there is a comment section on thes blog.
Johan Berglund

DUE on THURSDAY, NOV. 13th
on your blog 2 RENDERED VIEWS
Johan Berglund

DUE on THURSDAY, NOV. 13th
on your blog 2 RENDERED VIEWS
Sunday, November 9, 2008
Tuesday
For the next class we will be meeting again on the 8th floor. Have all your stuff completed by the time class starts so that we can have a smooth class. To the left I posted a new list of links to set you in a direction for the next assignment. Remember though, that the library is still the best unrivaled resource for this kind of assignment.
Final
We only have four class periods left in the semester so for the remainder we have will be focused on finishing the models of your design and creating dynamic renders that express key features of your building. This next assignment will be delivered in parts starting with
Part I
Finish your model. Your model will be completed by the next class period: Tuesday, Nov. 11th. You will submit in your server folder by the beginning of class 6 views of your model. These views may fall into the following categories
You should pick the views that best express your building and remember to be creative. You have many variables at your disposal such as lens angle and depth of field. We will discuss on Tuesday how to create dynamic views and which angles work best for your project. The render type will be hashed in the style best suited for the view [shaded, hidden line, etc] You will export these views at 72 dpi with one dimension at a max. of 1100 pixels. Name the files A_XXX_Ex5a.jpg. [A is a placeholder for 1-6].
Many of you do not have a great amount of experience in rendering or post-process entourage, therefore I will require each of you to adopt the style of a master. Each student will bring to class a rendering style either from a book or online, do your research. This style will be used as a guide to direct your final renders for your studio.
DUE on TUESDAY, NOV. 11th
in server folder 6 RENDERED VIEWS
1 RENDERING STYLE EXAMPLE
Part I
Finish your model. Your model will be completed by the next class period: Tuesday, Nov. 11th. You will submit in your server folder by the beginning of class 6 views of your model. These views may fall into the following categories
- interior perspective
- exterior perspective
- section perspective
- birds-eye view
- worms-eye view
- section axonometric
- panoramic
You should pick the views that best express your building and remember to be creative. You have many variables at your disposal such as lens angle and depth of field. We will discuss on Tuesday how to create dynamic views and which angles work best for your project. The render type will be hashed in the style best suited for the view [shaded, hidden line, etc] You will export these views at 72 dpi with one dimension at a max. of 1100 pixels. Name the files A_XXX_Ex5a.jpg. [A is a placeholder for 1-6].
Many of you do not have a great amount of experience in rendering or post-process entourage, therefore I will require each of you to adopt the style of a master. Each student will bring to class a rendering style either from a book or online, do your research. This style will be used as a guide to direct your final renders for your studio.
DUE on TUESDAY, NOV. 11th
in server folder 6 RENDERED VIEWS
1 RENDERING STYLE EXAMPLE
Monday, November 3, 2008
Tuesday
So when you complain about bad reviews just think of this poor girl. Tommorrow I expect improvement in all of your drawings. We will be meeting again on the 8th floor in room 801...ish. Be prepared to discuss your drawings and how they reflect the structure design of your building. I expect to see elaboration in all points of your diagrams. A couple of hints:
- Use a hiearchy of line weights with your max thickness being 1pt.
- Use color in your diagrams to elaborate points[arrows] or fill context[water hatches]
- Text should only be used to explain where a drawing cannot, be smart about this
- Scale figures can be a huge asset to certain drawings
- A thick outline will do wonders to seperate layers of information
I want these to look good and we will keep working on them till you fully understand these concepts. For the diligent students that submitted these diagrams into their server for last thursday, please submit a new file with the _revise suffix. For those that have an empty server folder, submit the files as per the instructions of the assignment.
And heads up, I will be grading soon and some of you may want to look at your blogs. These reflect your progress in the class and should be kept up to date.
Sunday, November 2, 2008

Friday, October 31, 2008
Diagram Diaries

Once again the above image is taken from LTL. Look at how they use the techniques of exploded axon combined with pulling out details at a larger scale. This may be something you can appropriate for your own diagrams. I was generally impressed with the work in this last assignment, and for Tuesday I want to see it all polished up. Do not stop nitpicking your drawings until they are beautiful. Remember that clarity is paramount. Below are some of the best examples from Thursday:


Sunday, October 26, 2008
Ex4-1
Structure Diagramming
exercise goals
To express the structure of a building through clear diagrams. These diagrams should convey the idea of the space without the excessive use of instructional text. Therefore careful attention should be paid to elements such as simple scale figures, arrows, hatching patterns, line thickness, color patches and color choices.
performance procedure
1) Discuss with your instructor the structure of your building. Using you current knowledge of your structure system of choice [tensile, concrete, steel, etc.] develop a system that will work best for your design. Express this structure using an exploded axonometric drawing. This drawing may be simple, but must clearly express your system of choice.
This drawing may be done in a 2d drafting program, but I strongly recommend using a modeling program to manually separate structural layers of your building. Note, the students whose design is situated below grade must show the space from which these building are extruded. This is a very important element of your structural design and must be communicated.
2) With a new found understanding of your structural system of choice, make a new drawing. This drawing will be simple diagram of the loads on your building. Develop this drawing in section and pay careful attention to live and dead loads. The best way to draw these loads is through a hierarchy of arrows. Look at Chin diagrams [or other structure books] to get an example of how these diagrams should look.
For this exercise you will primarily be using Adobe Illustrator. This program is the best for editing graphics, but any ground work for these diagrams may be done by hand, in your drafting program of choice [for example finish sections and plans in autocad, they will be the basis for your diagrams] or your 3d modeler of choice.
BRING ROUGH DRAWINGS AND IDEAS TO CLASS ON THE NEXT CLASS PERIOD, TUESDAY, OCT. 28TH.
3) Use the advice from your crit, and begin to make these diagrams in Illustrator. The program excels at clean and clear graphics, and your diagrams should look the same. Remember that the most important point of these drawings is clear communication.
4) For these diagrams the following requirements should be adhered to:
a) you may only use 2-3 colors (a black, a grey tone and a color of choice)
b) you may only use 2-3 different line weights
c) you must use scale figures, arrows, hatches and/or color patches, but only when appropriate
5) For the final submission you will be required to submit 2 different diagrams, a exploded axonometric of your structure and a 2d section drawing of your structure's loads of your design.
a. A RGB, low res drawing (72 dpi) with a 900 x [choice] image size
required file name: Exxon_XXX_Ex4-1.jpg
b. A RGB, low res drawing (72 dpi) with a 900 x 600 image size
required file name: StrucLoads_XXX_Ex4-1.jpg
The above will be due in your folder on the server and on your blog by the beginning of class on Thursday, October 30th.
exercise goals
To express the structure of a building through clear diagrams. These diagrams should convey the idea of the space without the excessive use of instructional text. Therefore careful attention should be paid to elements such as simple scale figures, arrows, hatching patterns, line thickness, color patches and color choices.
performance procedure
1) Discuss with your instructor the structure of your building. Using you current knowledge of your structure system of choice [tensile, concrete, steel, etc.] develop a system that will work best for your design. Express this structure using an exploded axonometric drawing. This drawing may be simple, but must clearly express your system of choice.
This drawing may be done in a 2d drafting program, but I strongly recommend using a modeling program to manually separate structural layers of your building. Note, the students whose design is situated below grade must show the space from which these building are extruded. This is a very important element of your structural design and must be communicated.
2) With a new found understanding of your structural system of choice, make a new drawing. This drawing will be simple diagram of the loads on your building. Develop this drawing in section and pay careful attention to live and dead loads. The best way to draw these loads is through a hierarchy of arrows. Look at Chin diagrams [or other structure books] to get an example of how these diagrams should look.
For this exercise you will primarily be using Adobe Illustrator. This program is the best for editing graphics, but any ground work for these diagrams may be done by hand, in your drafting program of choice [for example finish sections and plans in autocad, they will be the basis for your diagrams] or your 3d modeler of choice.
BRING ROUGH DRAWINGS AND IDEAS TO CLASS ON THE NEXT CLASS PERIOD, TUESDAY, OCT. 28TH.
3) Use the advice from your crit, and begin to make these diagrams in Illustrator. The program excels at clean and clear graphics, and your diagrams should look the same. Remember that the most important point of these drawings is clear communication.
4) For these diagrams the following requirements should be adhered to:
a) you may only use 2-3 colors (a black, a grey tone and a color of choice)
b) you may only use 2-3 different line weights
c) you must use scale figures, arrows, hatches and/or color patches, but only when appropriate
5) For the final submission you will be required to submit 2 different diagrams, a exploded axonometric of your structure and a 2d section drawing of your structure's loads of your design.
a. A RGB, low res drawing (72 dpi) with a 900 x [choice] image size
required file name: Exxon_XXX_Ex4-1.jpg
b. A RGB, low res drawing (72 dpi) with a 900 x 600 image size
required file name: StrucLoads_XXX_Ex4-1.jpg
The above will be due in your folder on the server and on your blog by the beginning of class on Thursday, October 30th.
Saturday, October 25, 2008
BEST SECTION PHOTO
These two photographs enhance the built model/drawing sections. In Leo's shot, good lighting adds that extra depth to the drawing/model and makes the image come alive. Extra care was taken to line up the shot as directly in-front of the section cut as possible. The darkness of the model and lightness of the paper work well together. Greg H's image has an unusual angle that adds interest to the shot. The viewer needs to study the image to gain an understanding of what is happening. The depth of field is well executed and deepens the shot by having some elements out of focus and other elements crisp and clear. The smudges on the plexi (which don't look good in the physical model) give the photo a texture and point of focus aided by the lighting. Both of these images would look good in a portfolio and demonstrate more than a simple picture taken to prove that the work was completed.


Tuesday, October 21, 2008

Friday, October 17, 2008
Renders for Tuesday
For the next assignment I need you to keep your focus on the design of your water containers. You need to model, in detail, a sample of your pool system. Most of you I have specified exactly what you need to zone in on, but for those still unsure you need to make a section model that demonstrates the unique character of your water container.
and any other additional information that you can think to include in either the modeling, illustrator or photoshop phase of this assignment. Once your model is completed you must take multiple renders [specifically a hidden line and a wireframe] and compile them together in illustrator. This is a step all should be familiar with. After the drawing is compiled you will use the skills you learned in class to add entourage to your drawings. This extra entourage should demonstrate water level, human scale and human interaction with your water contatiner. How this is displayed is individual to the project, so be creative.
DUE: on Tuesday at the beginning of class you will be required to have a final entourage render on your blog. This drawing should be a minimum of 900 pixels [largest dim] at 72 DPI and RGB
LTL Renders:
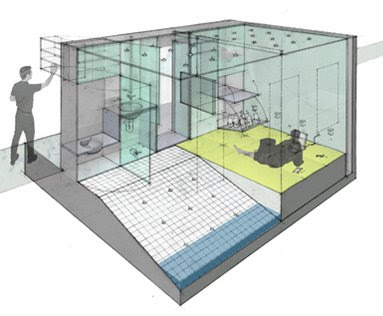
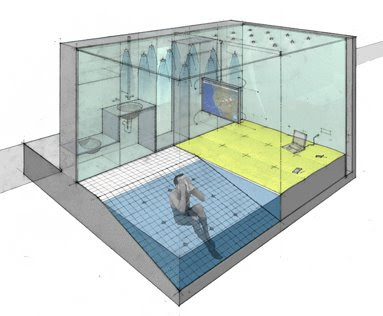
- Levels of information include:
- water drainage and distribution systems
- structure systems
- material call outs
- measurement call outs
and any other additional information that you can think to include in either the modeling, illustrator or photoshop phase of this assignment. Once your model is completed you must take multiple renders [specifically a hidden line and a wireframe] and compile them together in illustrator. This is a step all should be familiar with. After the drawing is compiled you will use the skills you learned in class to add entourage to your drawings. This extra entourage should demonstrate water level, human scale and human interaction with your water contatiner. How this is displayed is individual to the project, so be creative.
DUE: on Tuesday at the beginning of class you will be required to have a final entourage render on your blog. This drawing should be a minimum of 900 pixels [largest dim] at 72 DPI and RGB
LTL Renders:


Wednesday, October 15, 2008
Resources
ILoveSketch from Seok-Hyung Bae on Vimeo.
and check this link out for something invaluable to add to your drawing tool set. This plug-in allows you to bring in .DWG and .DXF files into Illustrator with layers intact. Hopefully this makes your life easier.
Subscribe to:
Posts (Atom)